Post by {§}V3NOm{§} on Jan 6, 2006 20:06:33 GMT -5
ok for people who dont know what PMI is...PMI is the ability to add scenery and and objects into other maps and for today i will be showing you how to add a wraith into a bloodgulch map and i apologize to skelito for taking up a big page for this but i have to show all the steps or no one would understand...so here it goes...how to PMI a wraith...
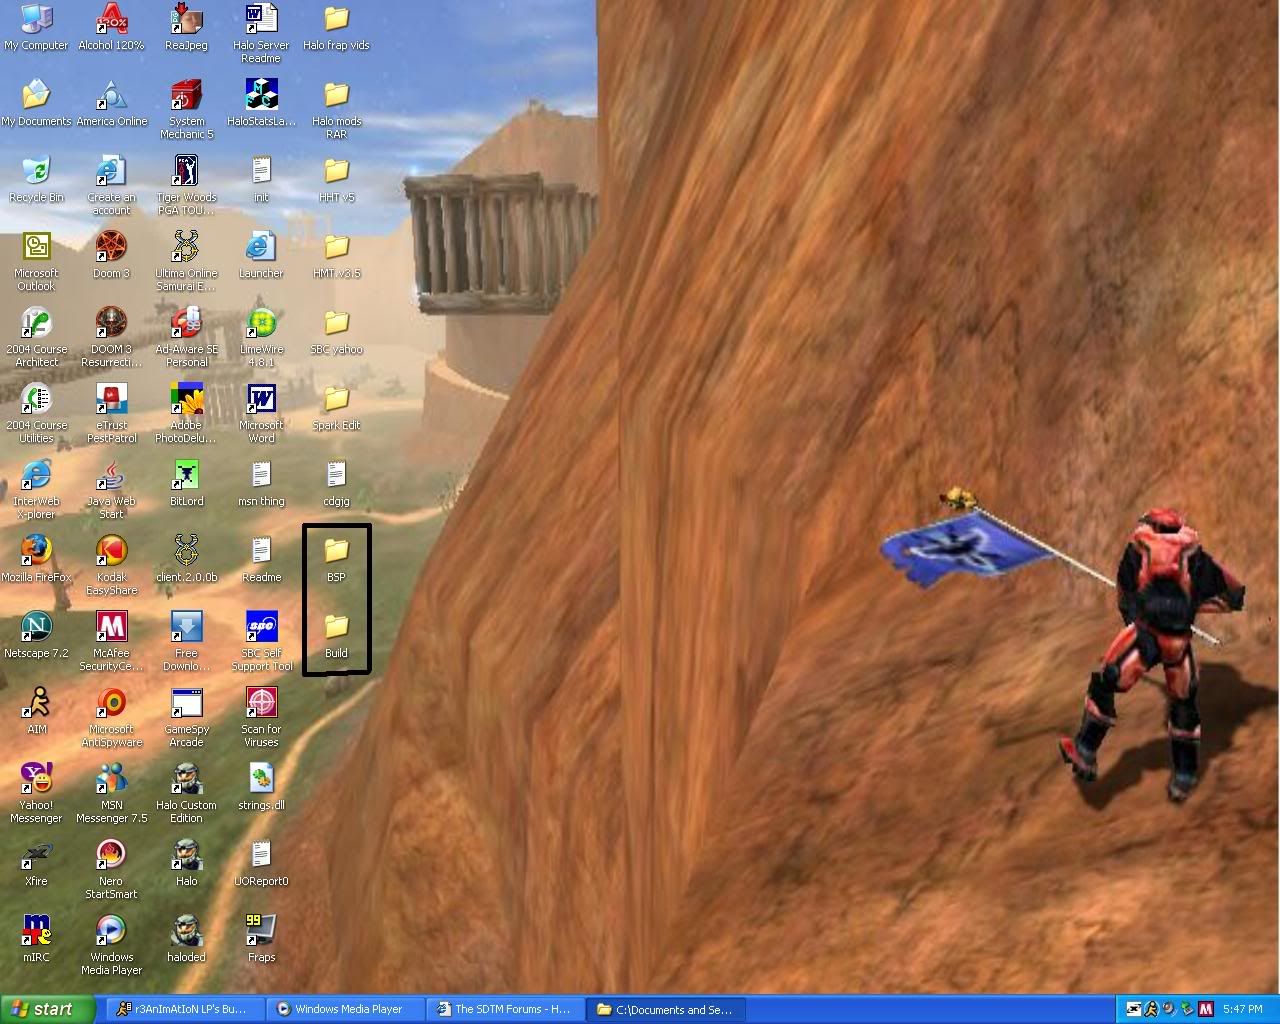
1 make two folders a build folder and bsp folder on the desktop and put a NONMODDED map into the build folder.
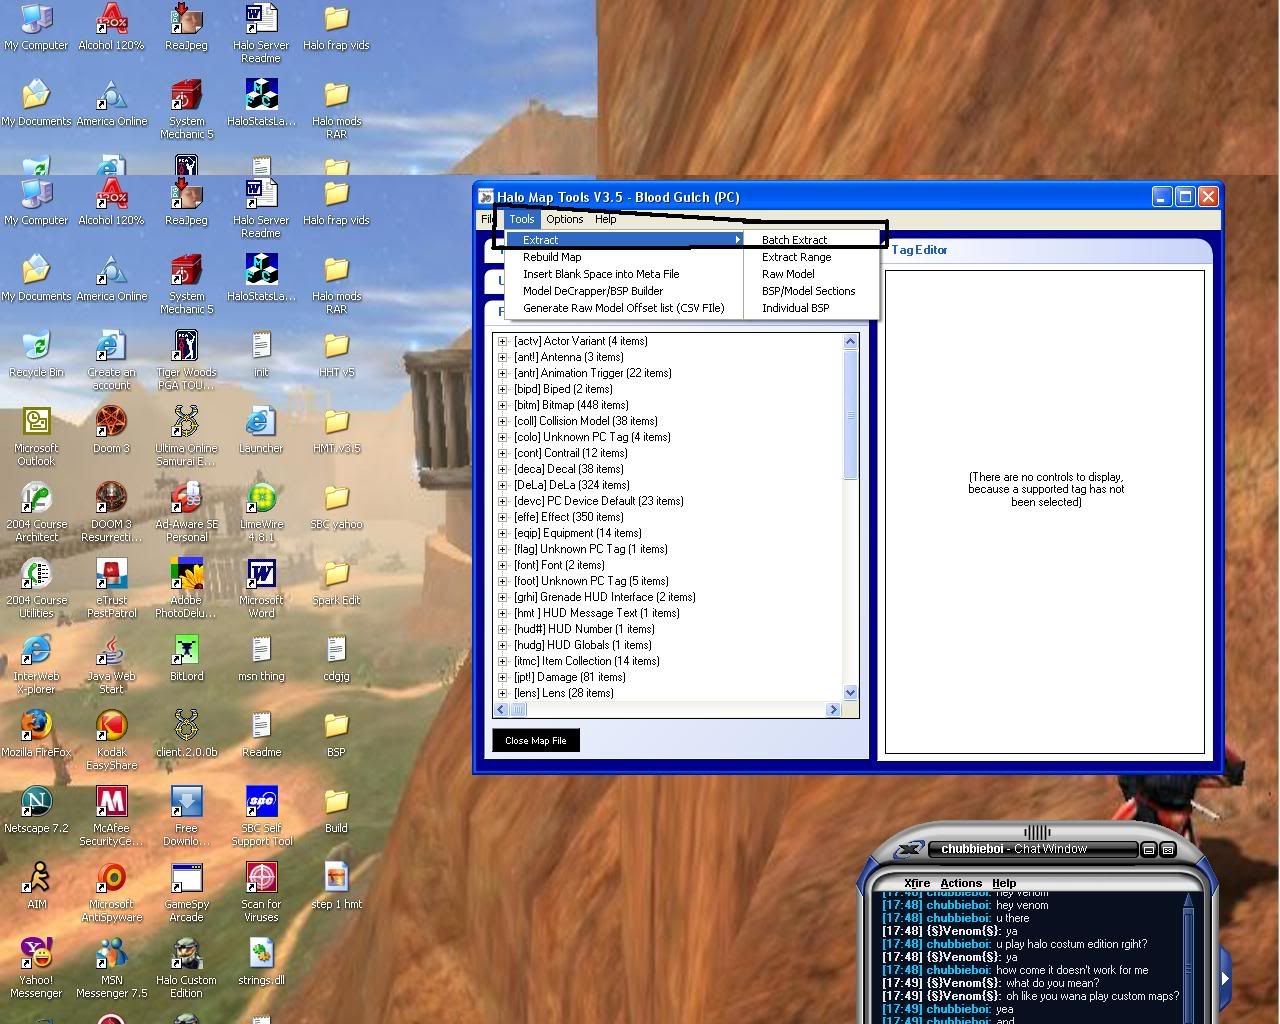
2..open up HMT and open the map you want to add the wraith to for this one im doing it to bloodgulch....go to tools and click batch extract.
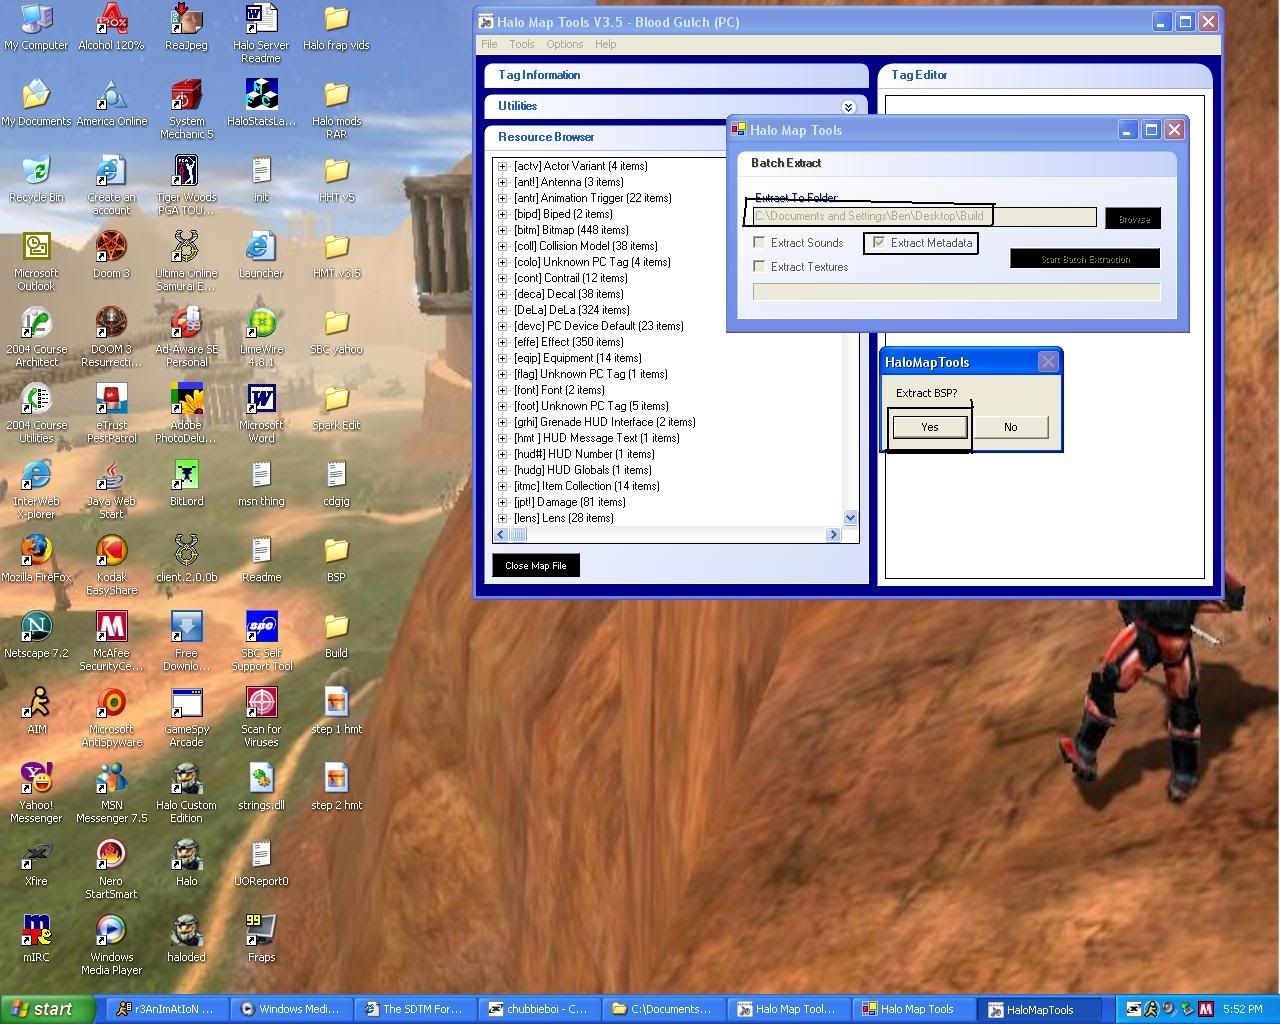
3.extract the metadata to the build folder and it will ask to extract the BSP and you click yes.
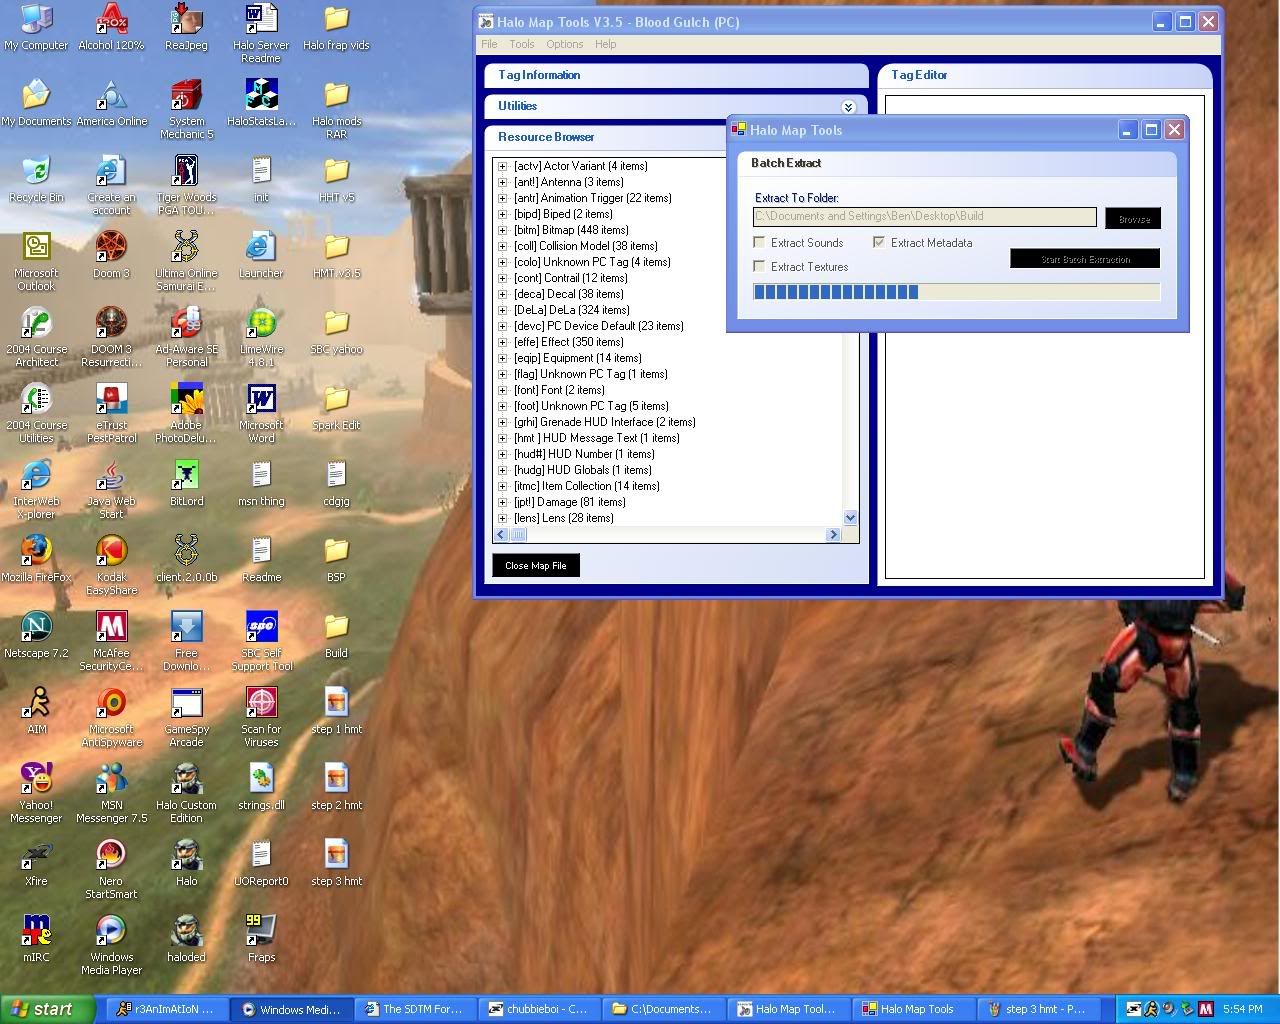
4..now you extract the map
5.after that is done you go to tools and click on BSP/model selections and you extract those folders to the BSP folder made on the desktop

6.now close that map and open up any map you want but for this map im going to open up b40.map
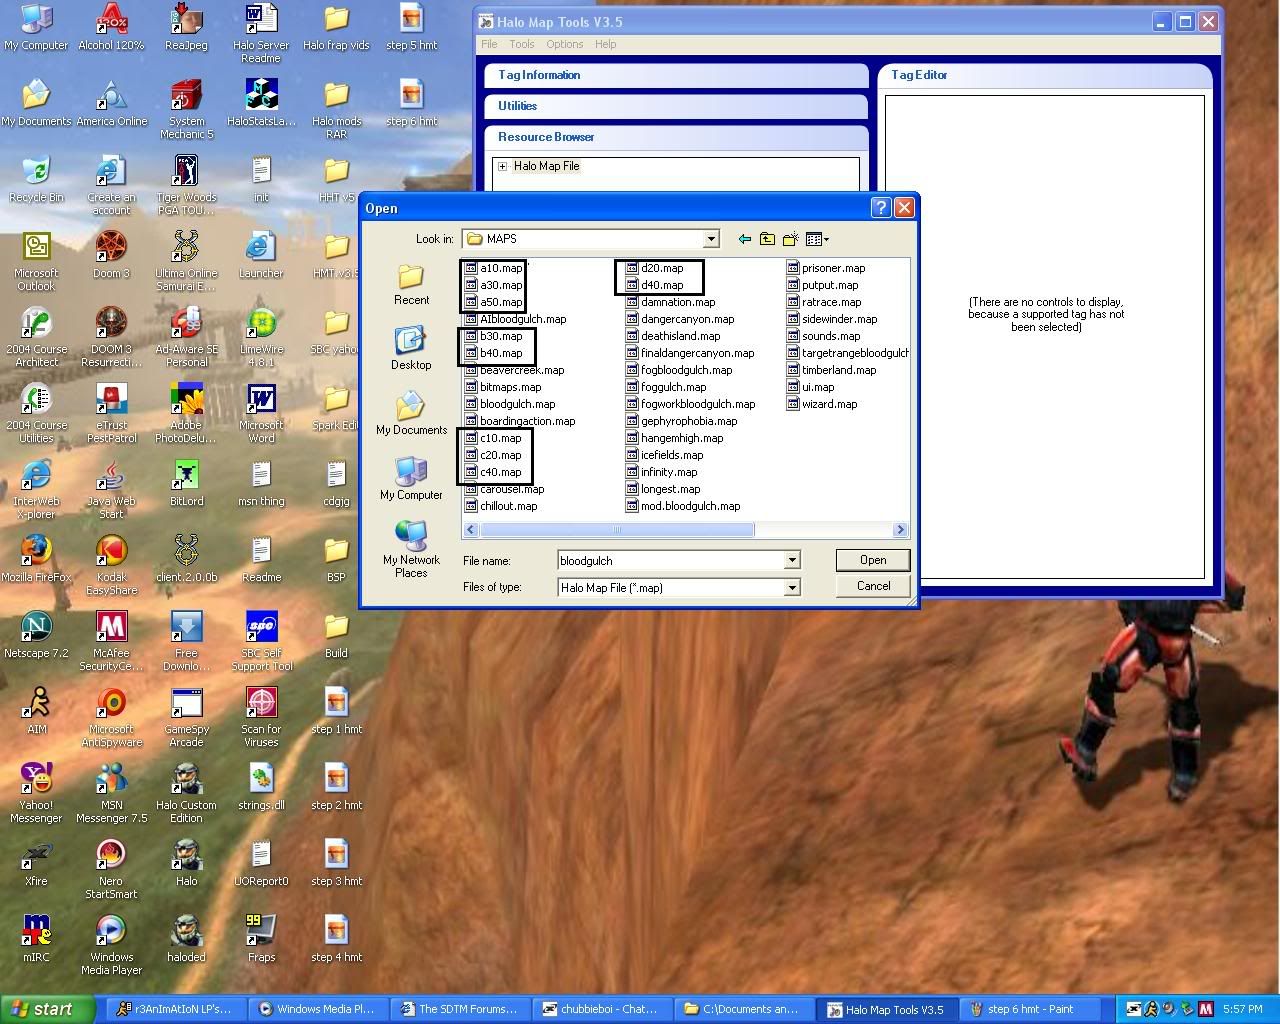
8.now when you have the map you want opened go to the vehicle's tag and and click on the wraith and save the meta and click on recursive and save it to the build folder

9.and save it to the build folder
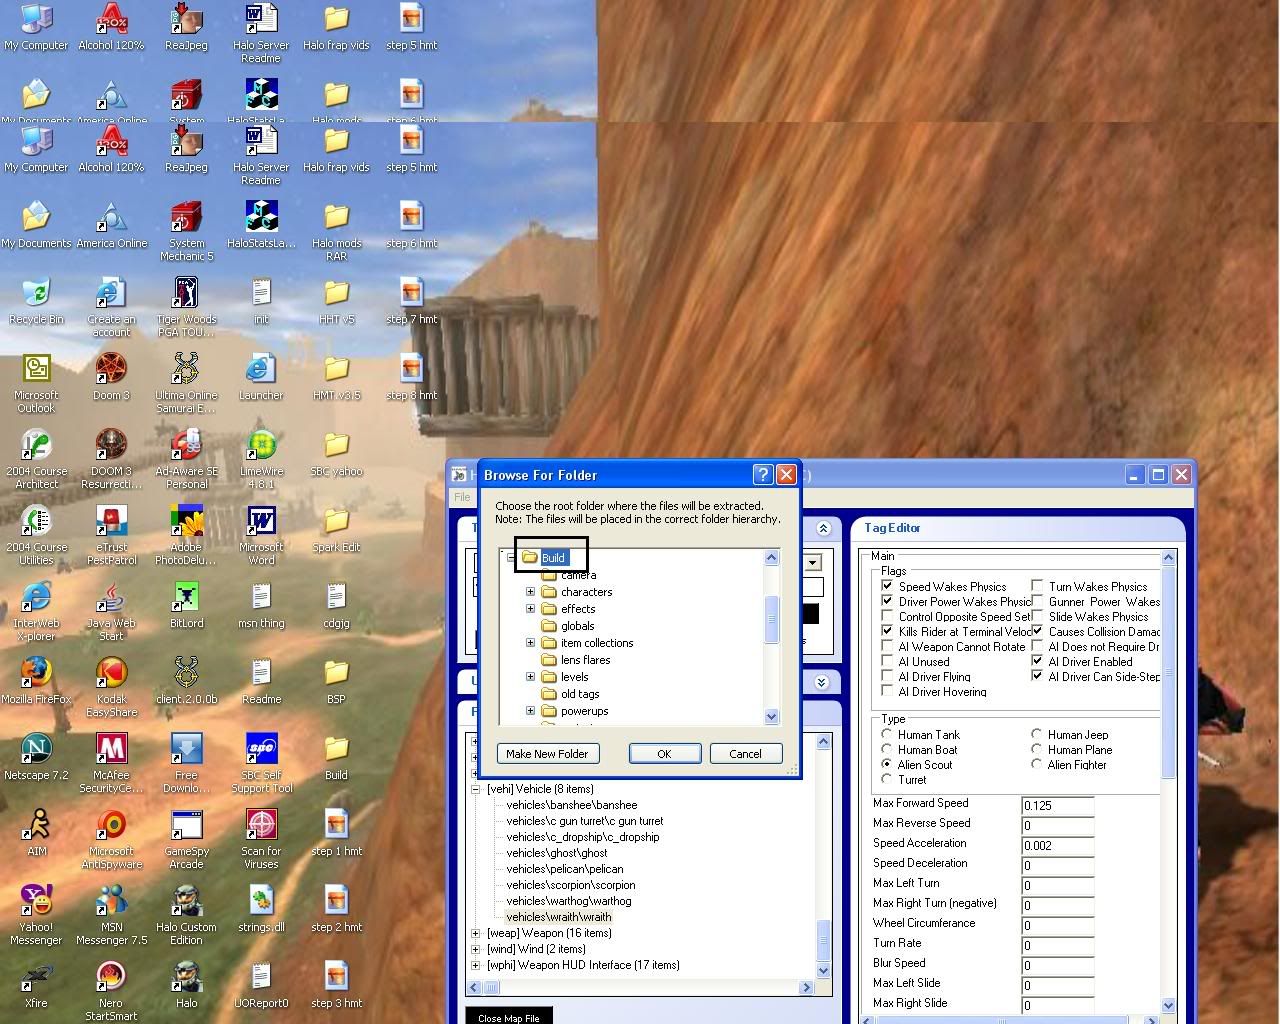
10.now once the files are saved you now make a offset list in order to extract the files needed for the wraith(save files to desktop)
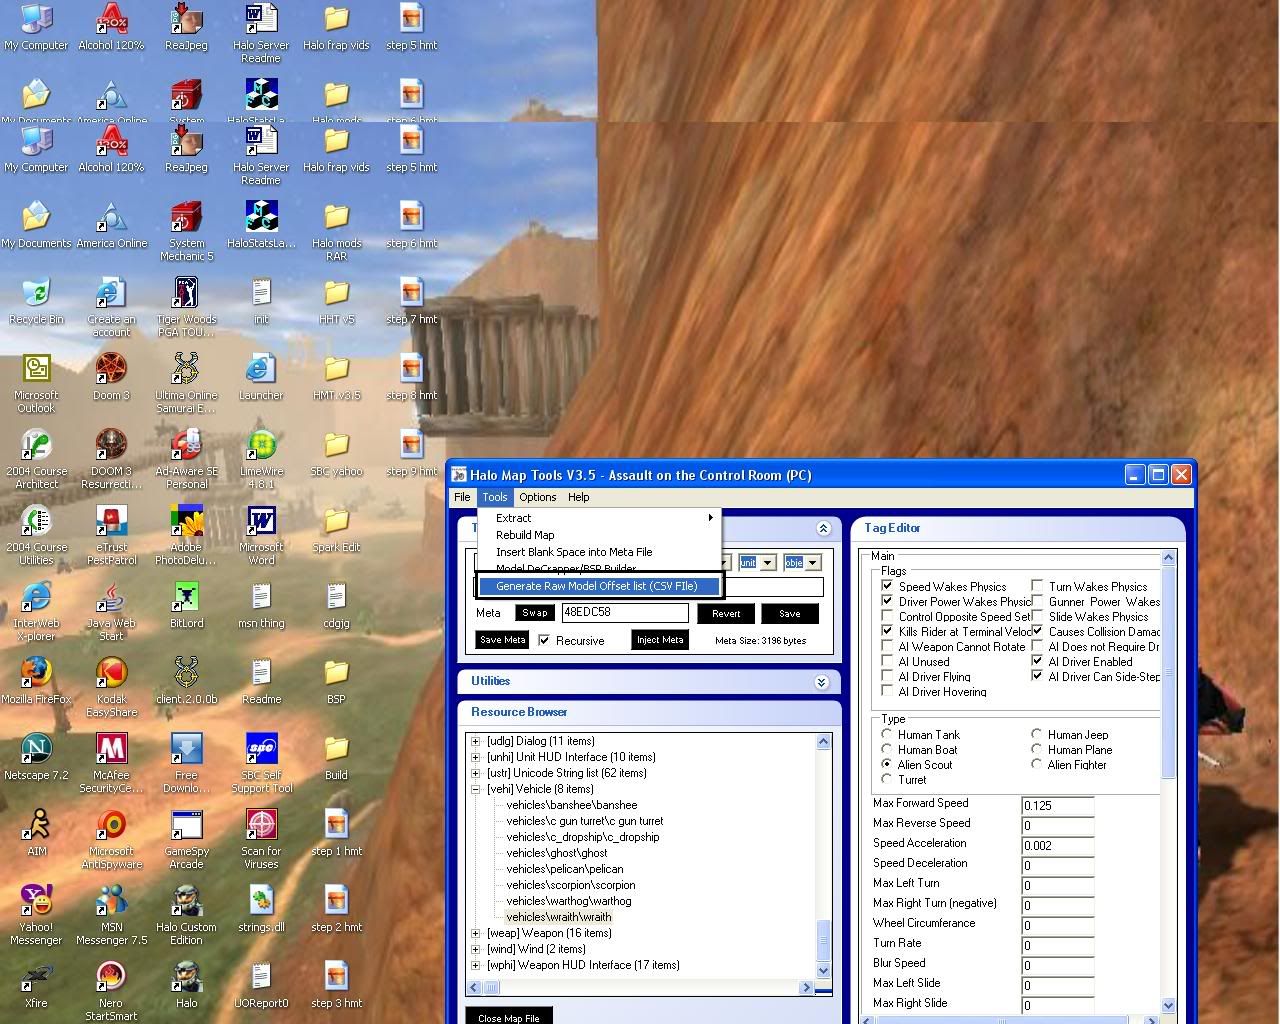
11.now go to tools and click on extract--> raw model and load the csv file that you saved
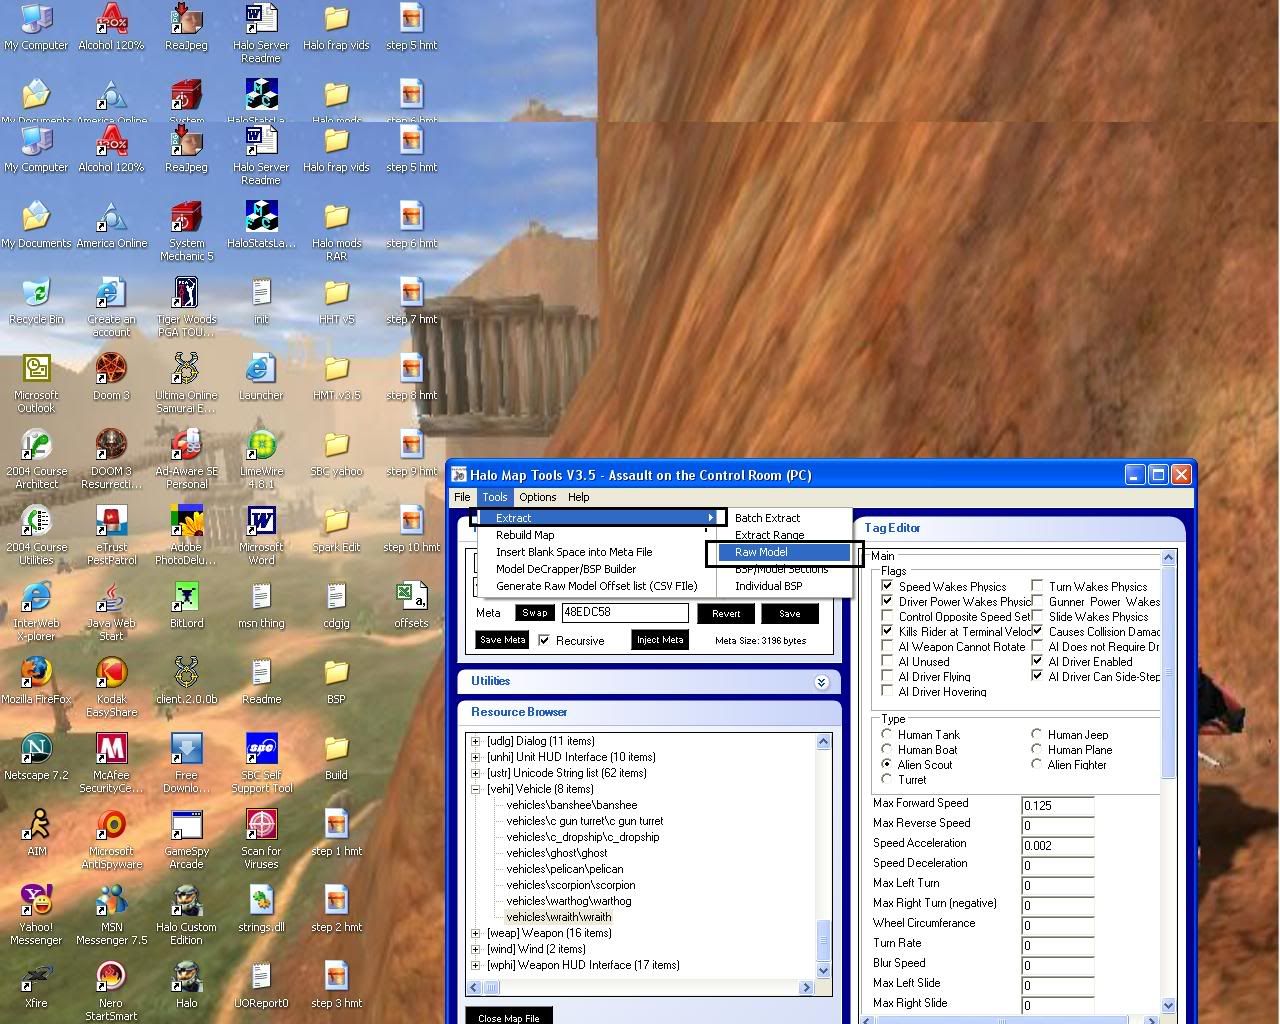
12.now open up the offset list you saved and scroll down to find the tag that says vehicles\wraith\wraith into the build folder where is tells you to extract the files to.
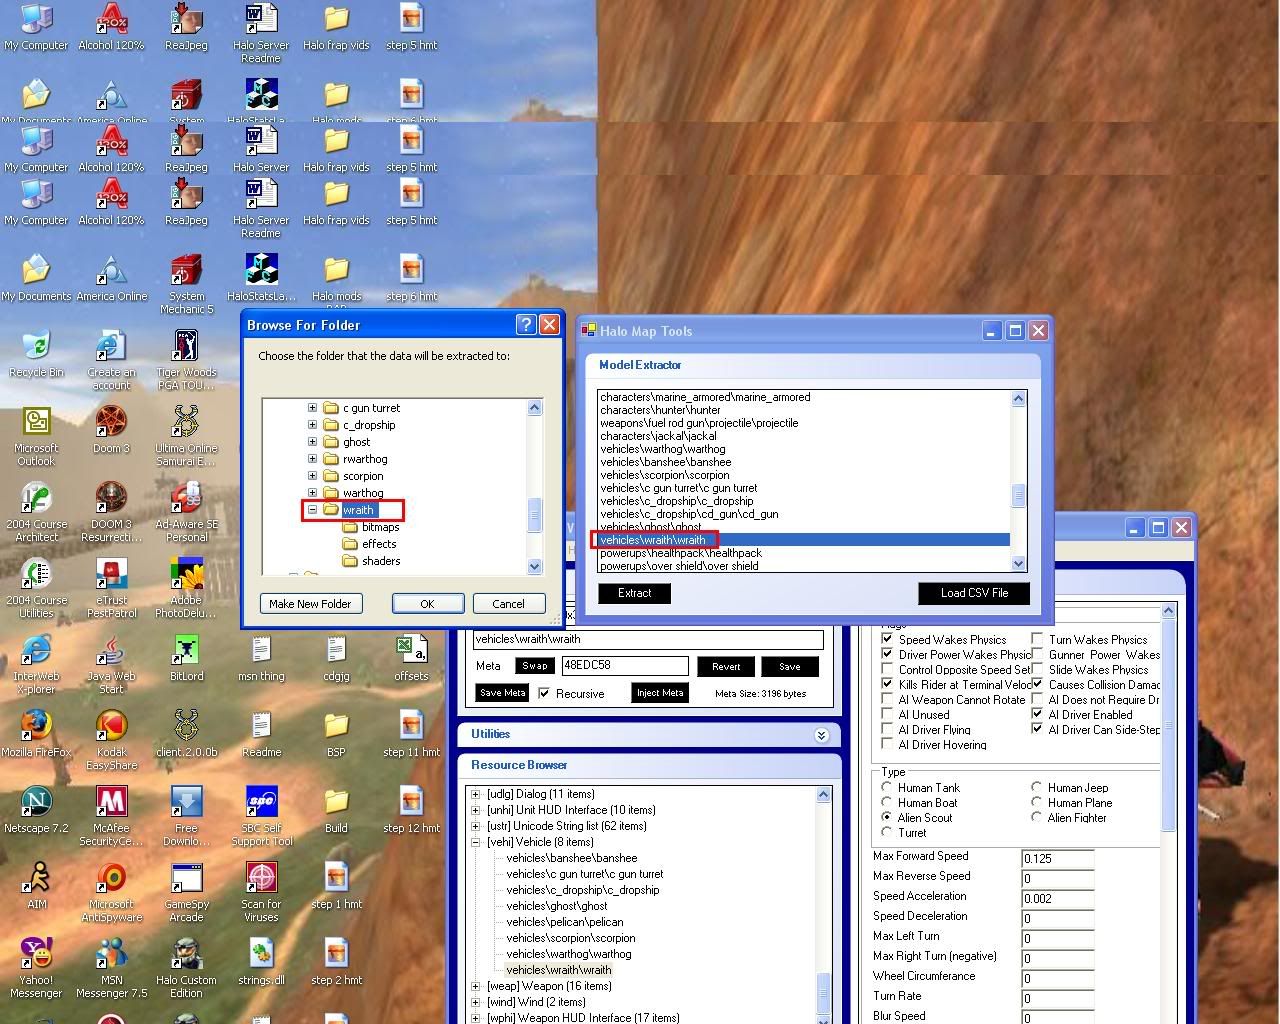
13.now go to tools and click on model decrapper and bsp builder and click add and go to the build folder and add the wraith.mod2.meta file
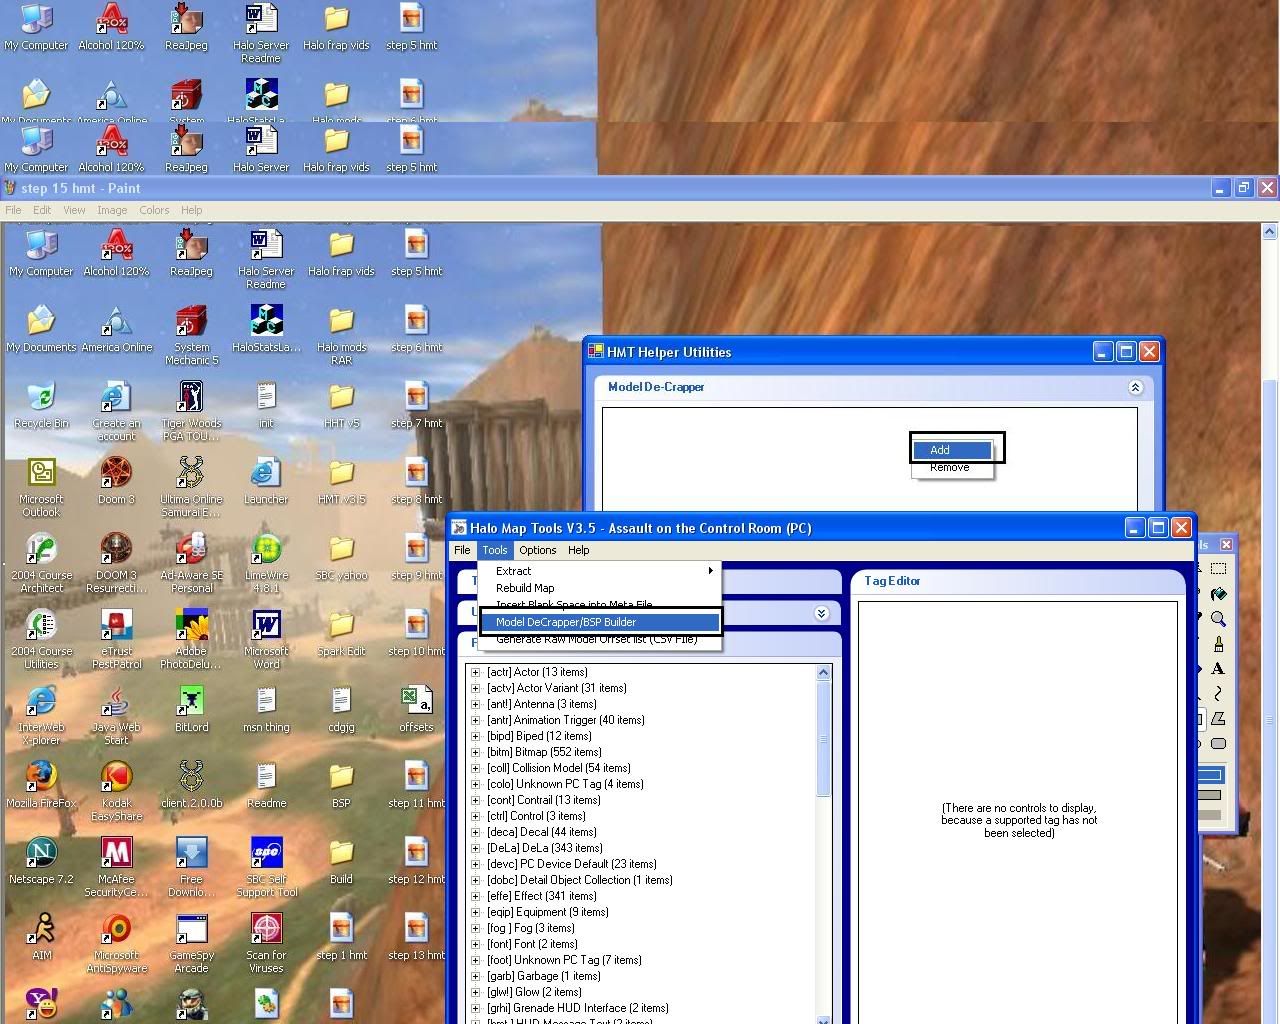
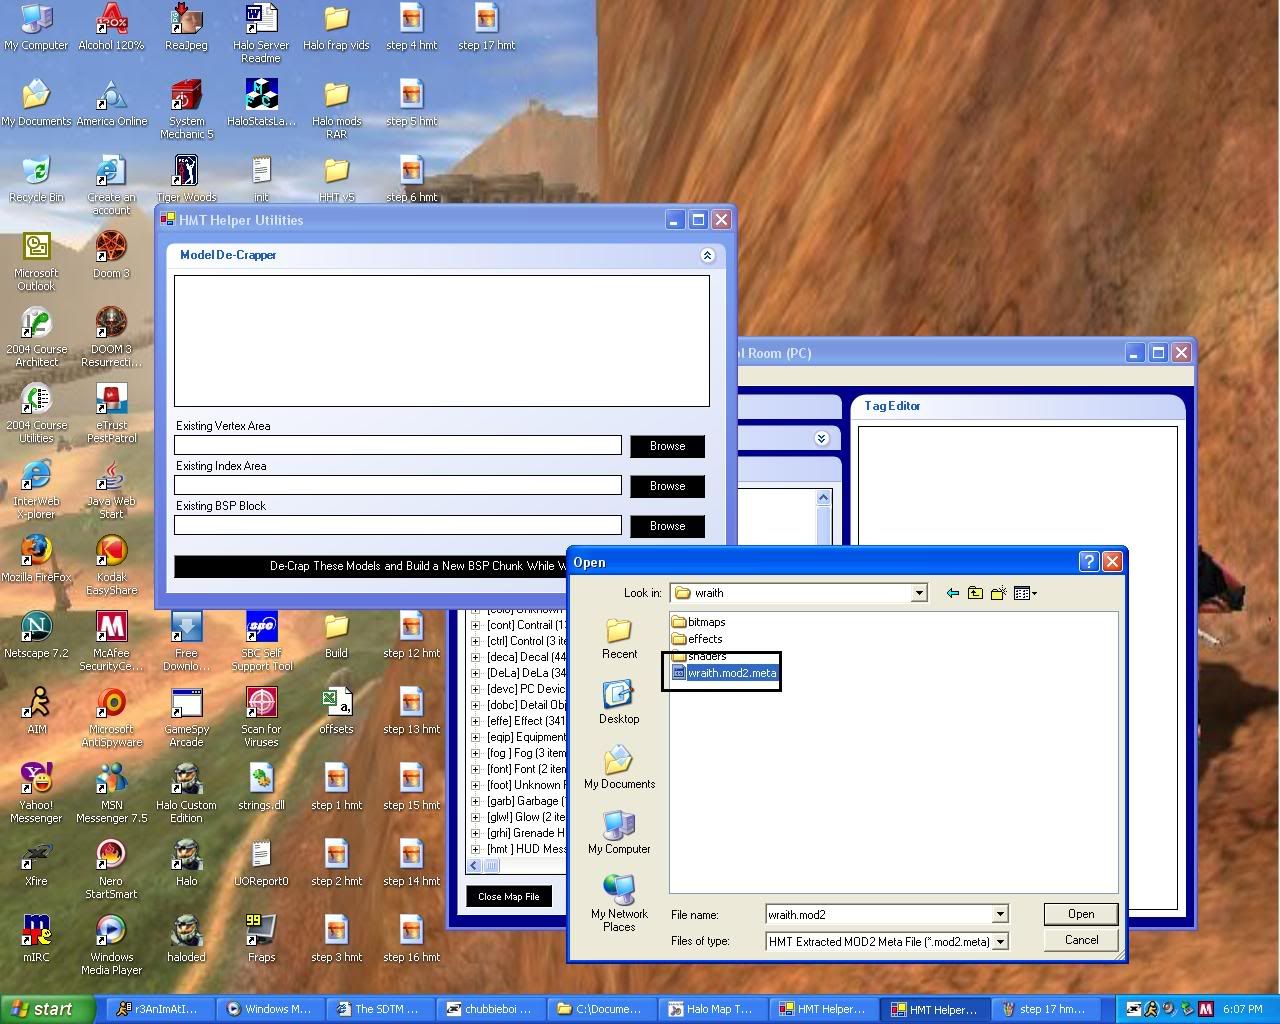
14. now click on the 3 icons below and add the 3 files.
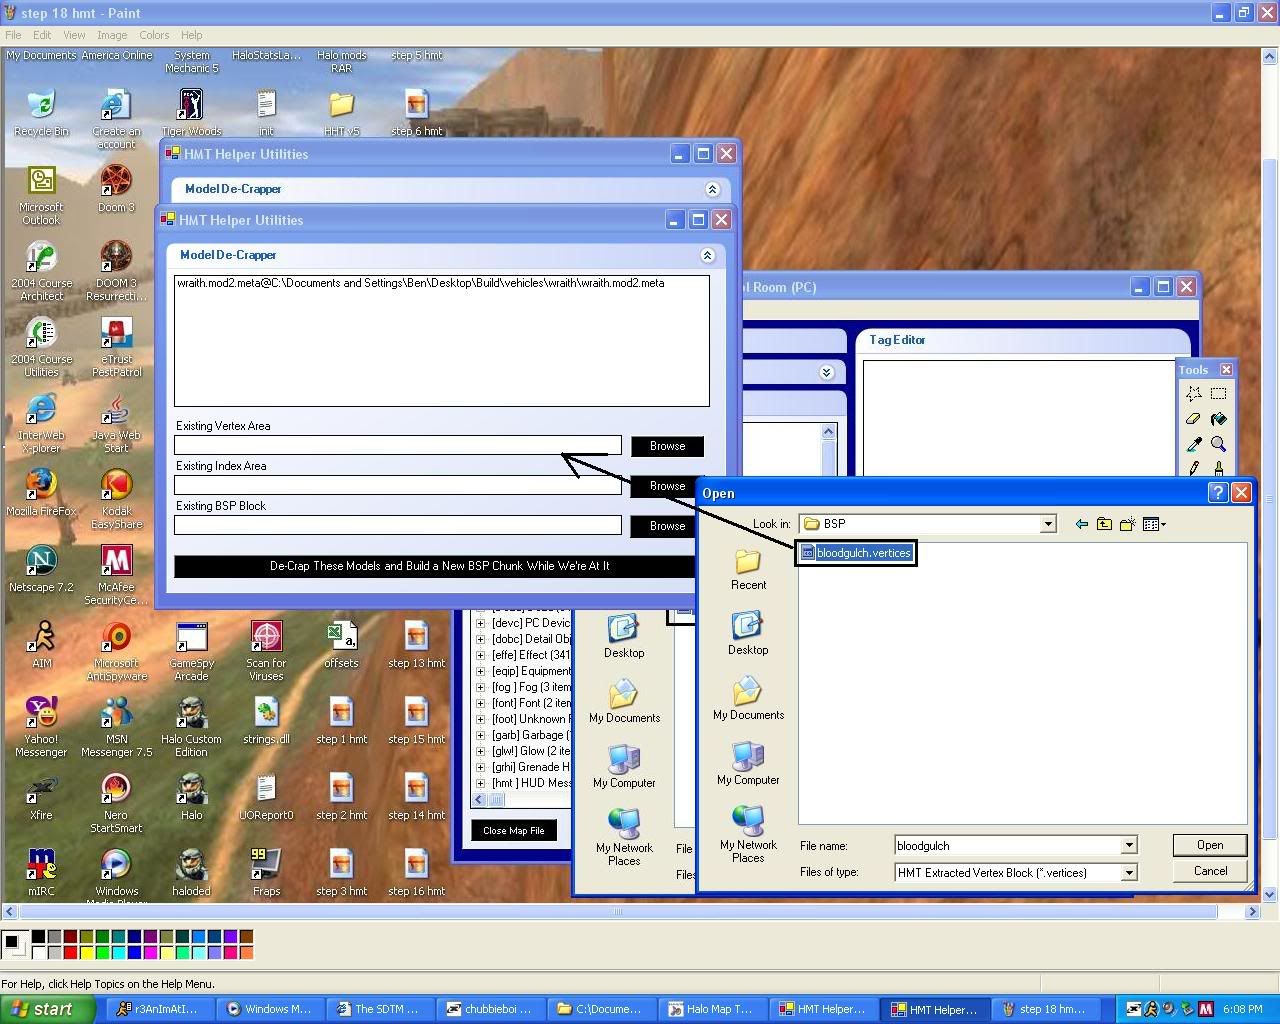
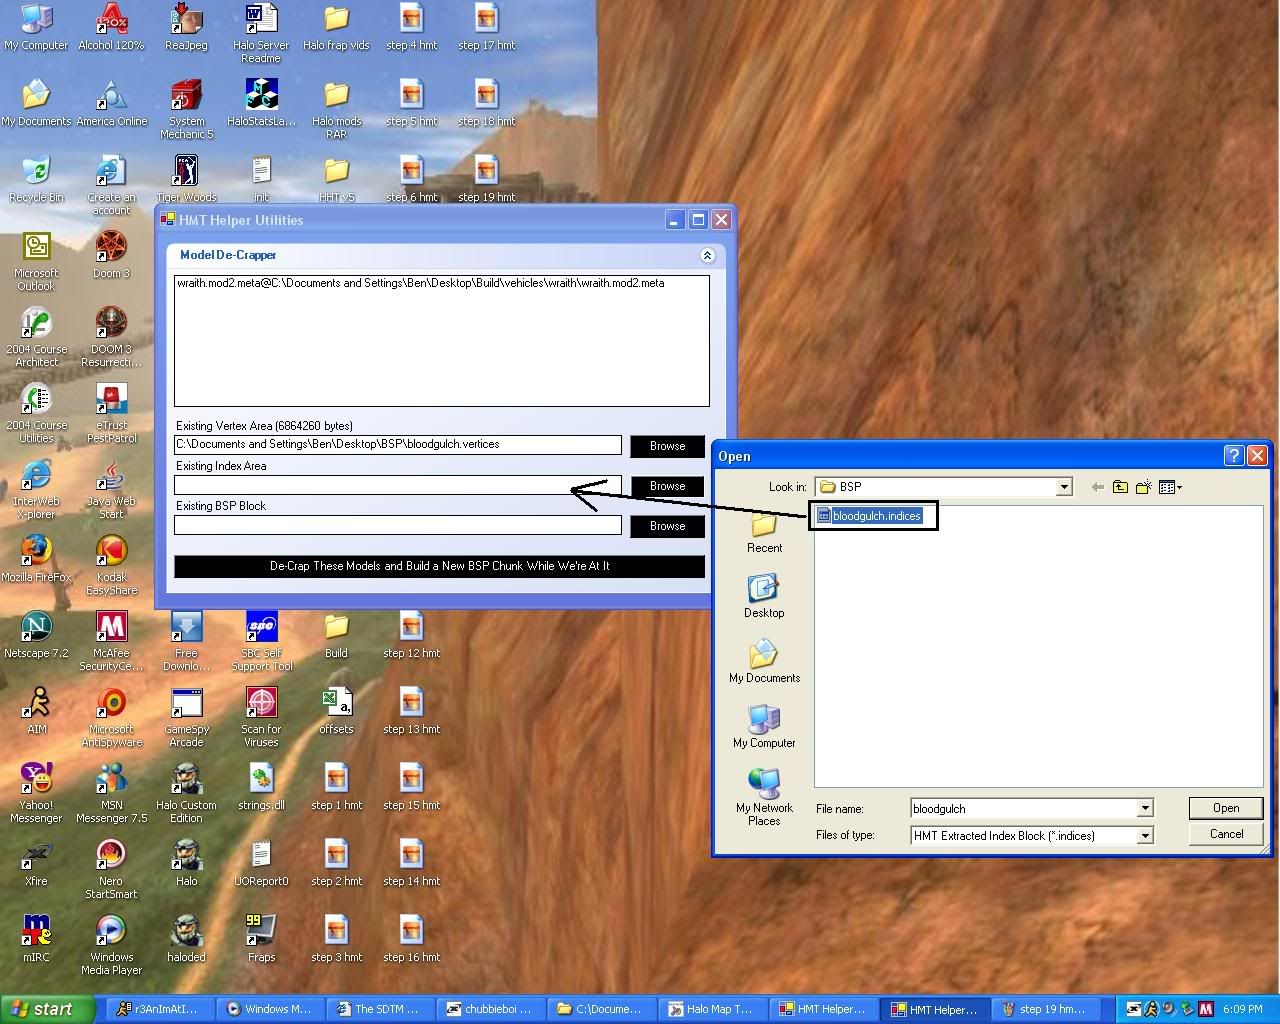

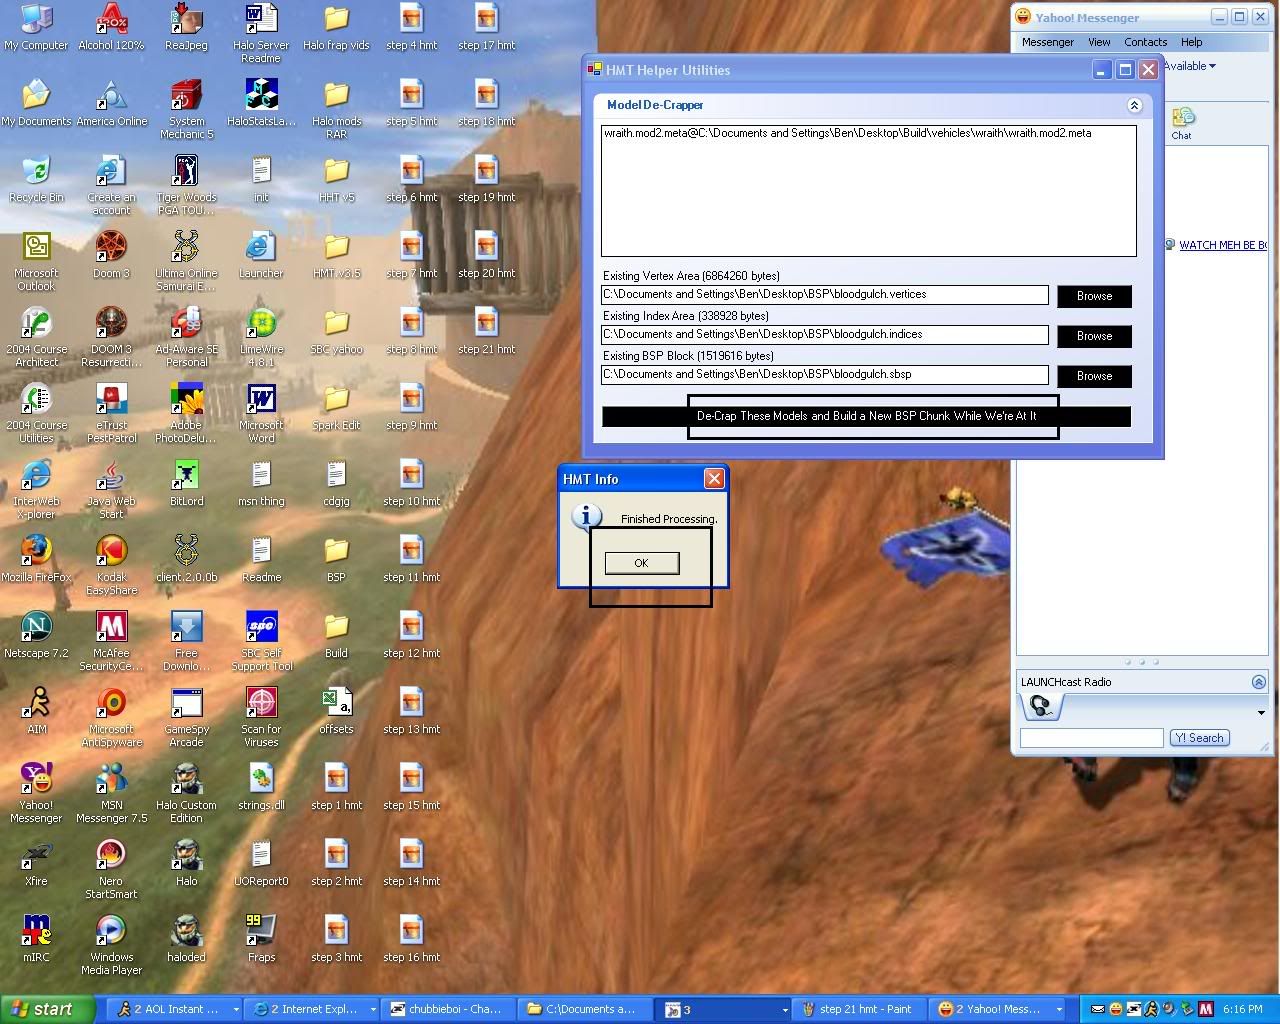
15.now click on decrap this model and bsp chuck while were at it
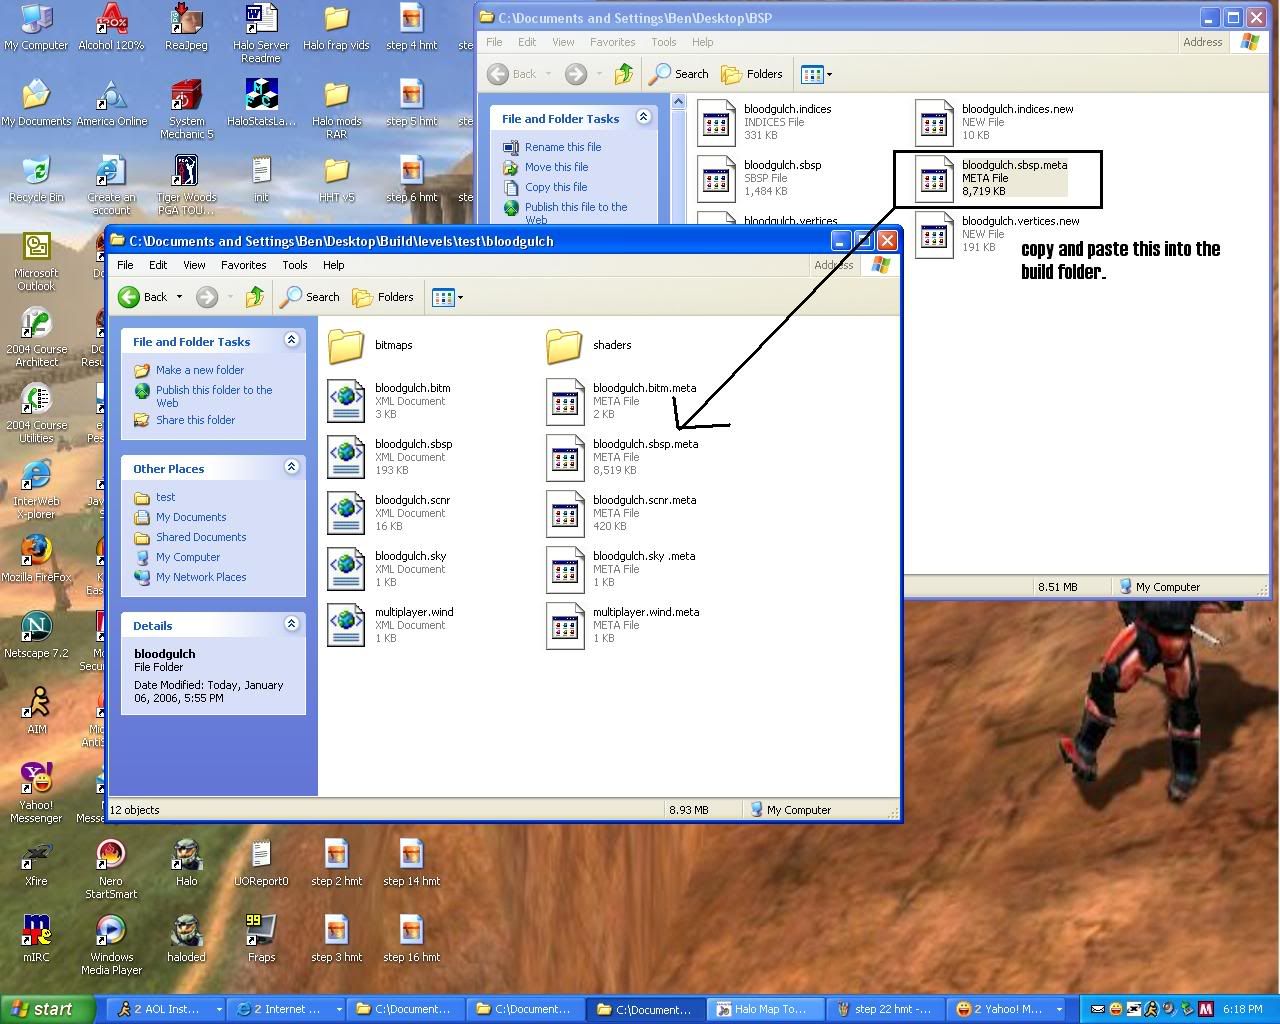
16.now go to the bsp folder and when you decrap the files you made 3 new files and one will say bloodgulch.sbsp.meta and you copy and paste that into build folder--->levels--->test--->bloodgulch and paste that file in there and over write the existing one.
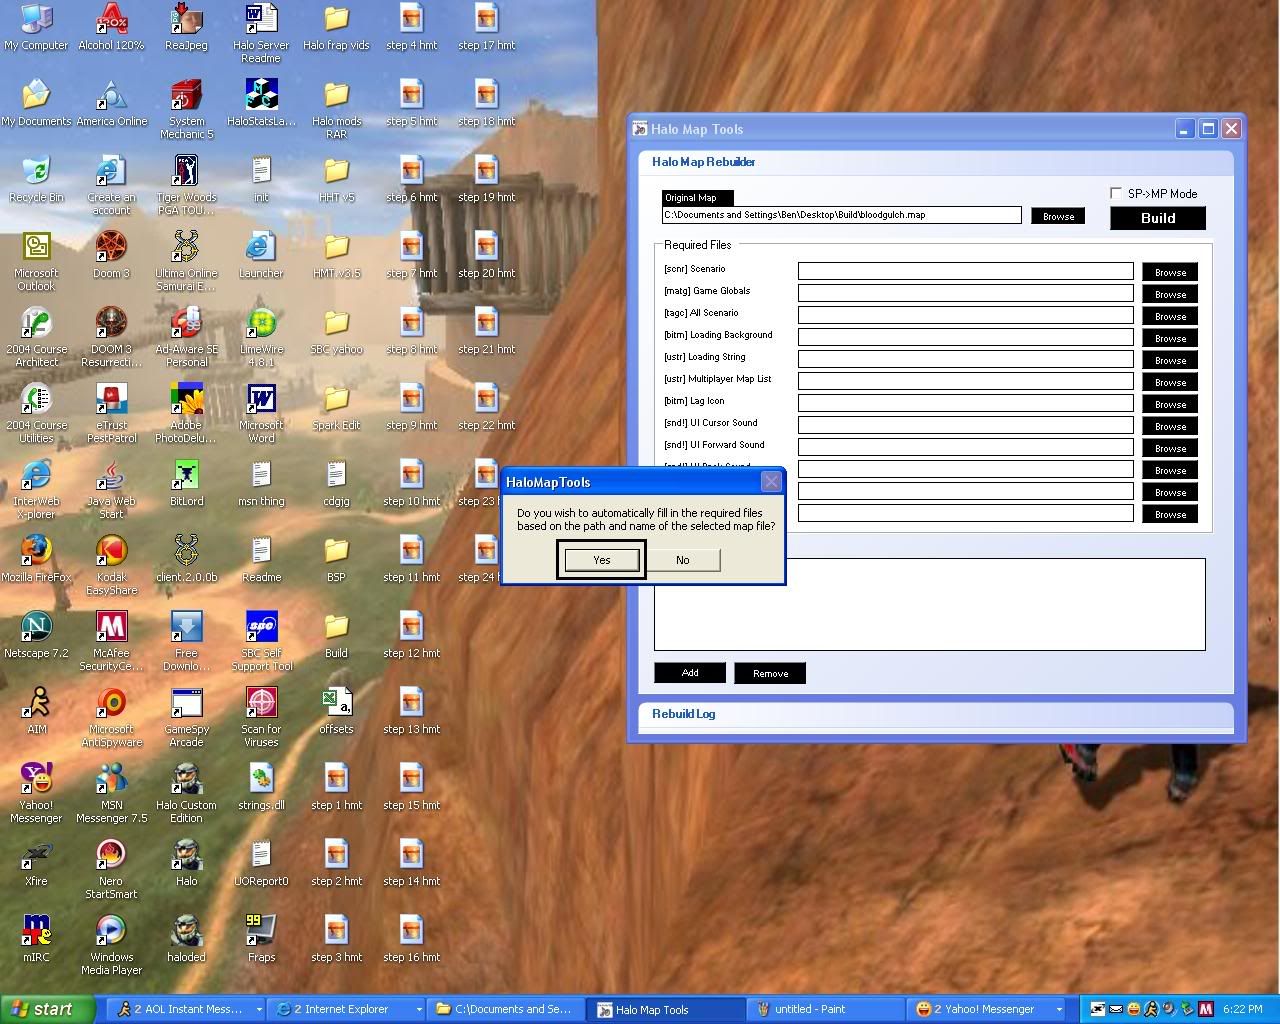
17.now close the map you have open in HMT and go to tools and click rebuild map and browse to find the map you put in the build folder and it will ask to add some files you need to rebuild and you click yes.
18.now go down to the bottom and right click and go to add....then go to the build folder and click on the vehicle folder and click on the wraith folder and copy those files into the add box in the map rebuilder.
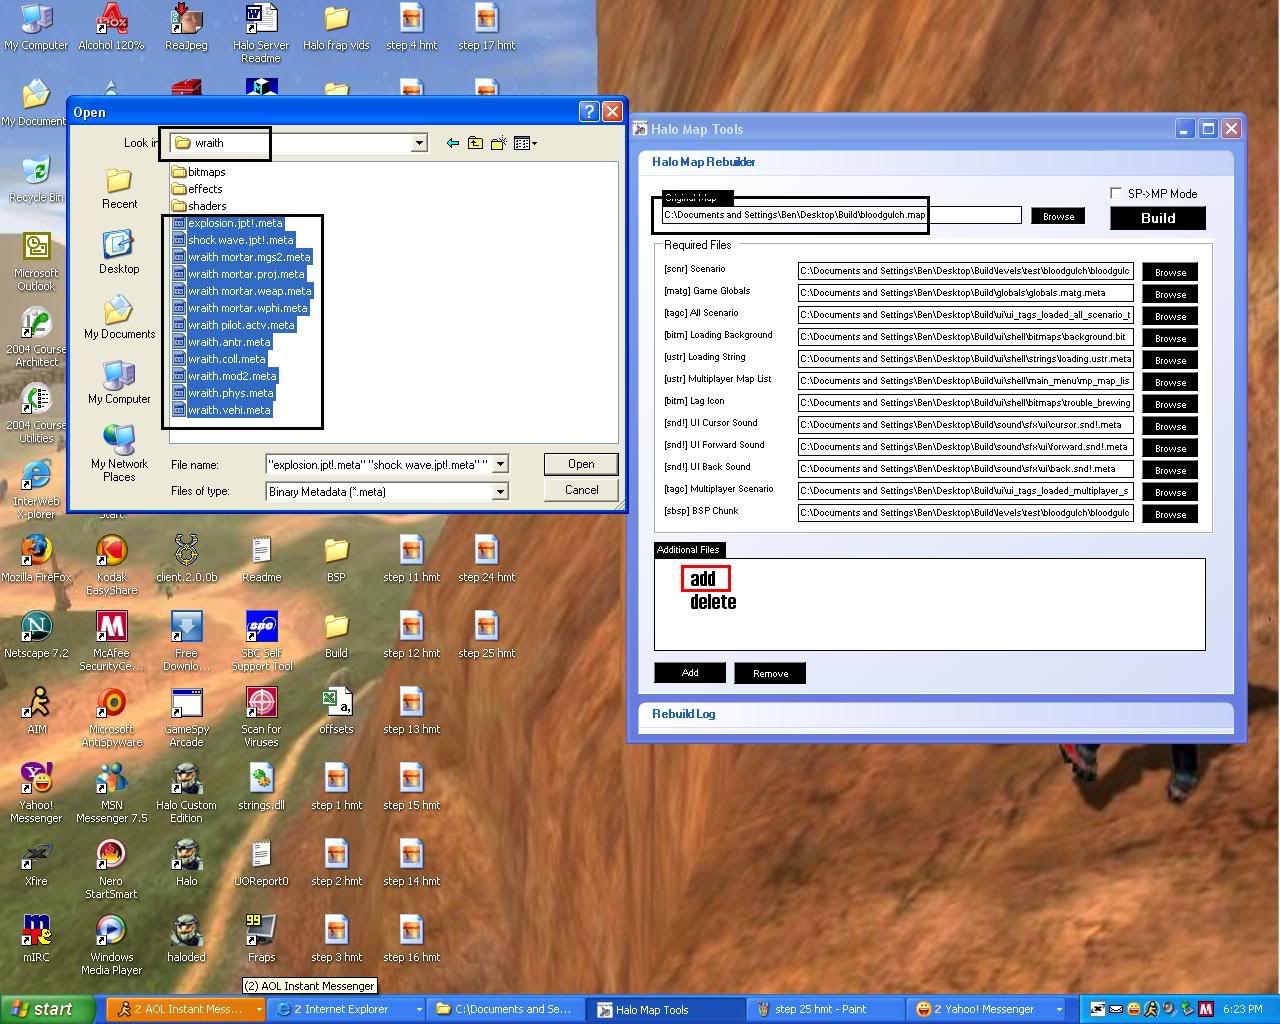
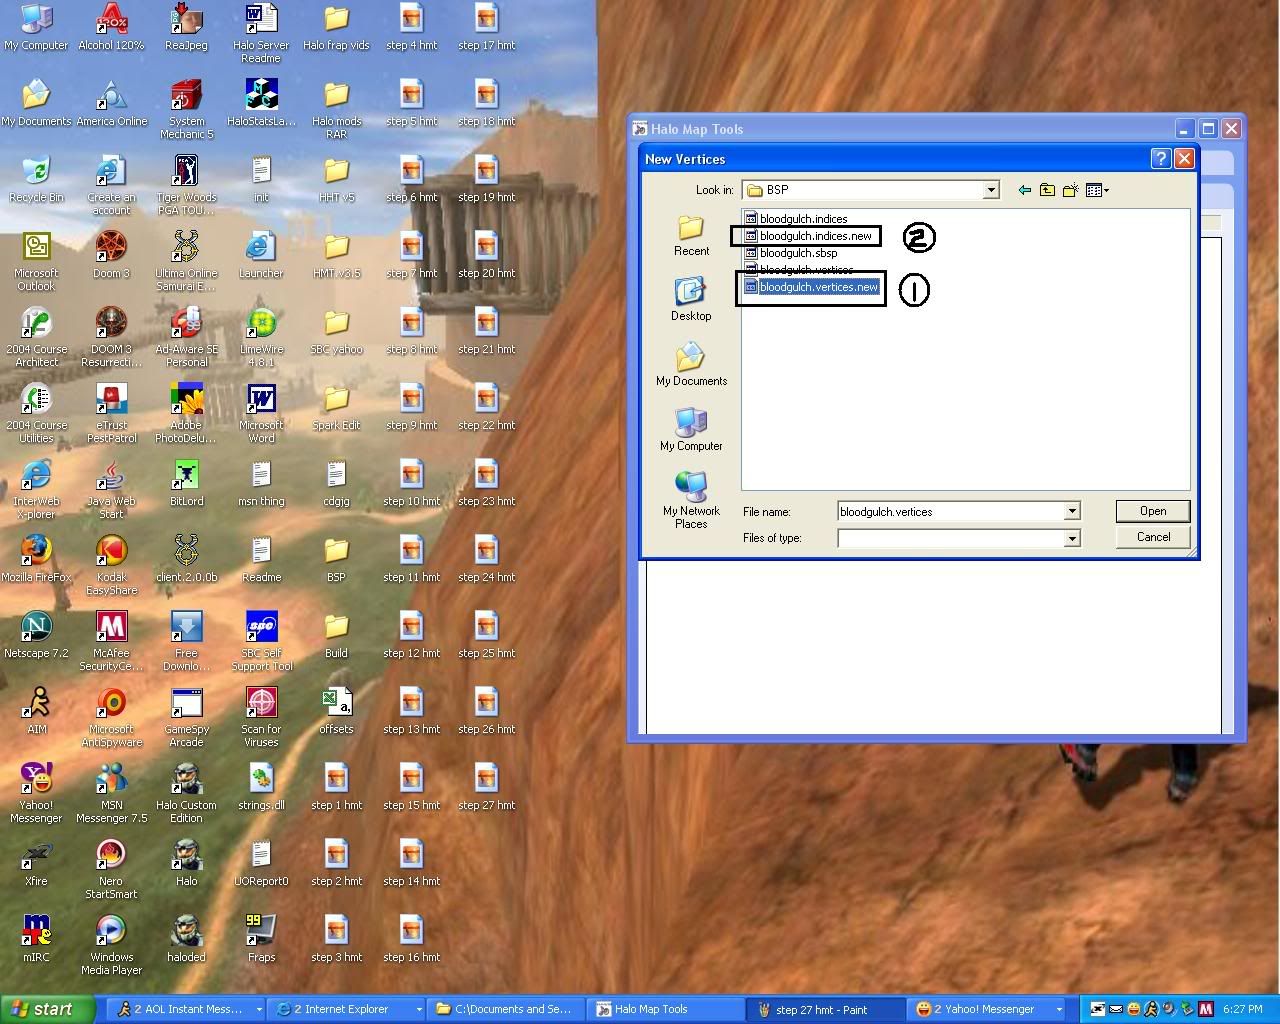
19.and then while its rebuilding it will ask if any new vertices and indices have been changed and you click yes to both and add the two files in the BSP folder on the desktop

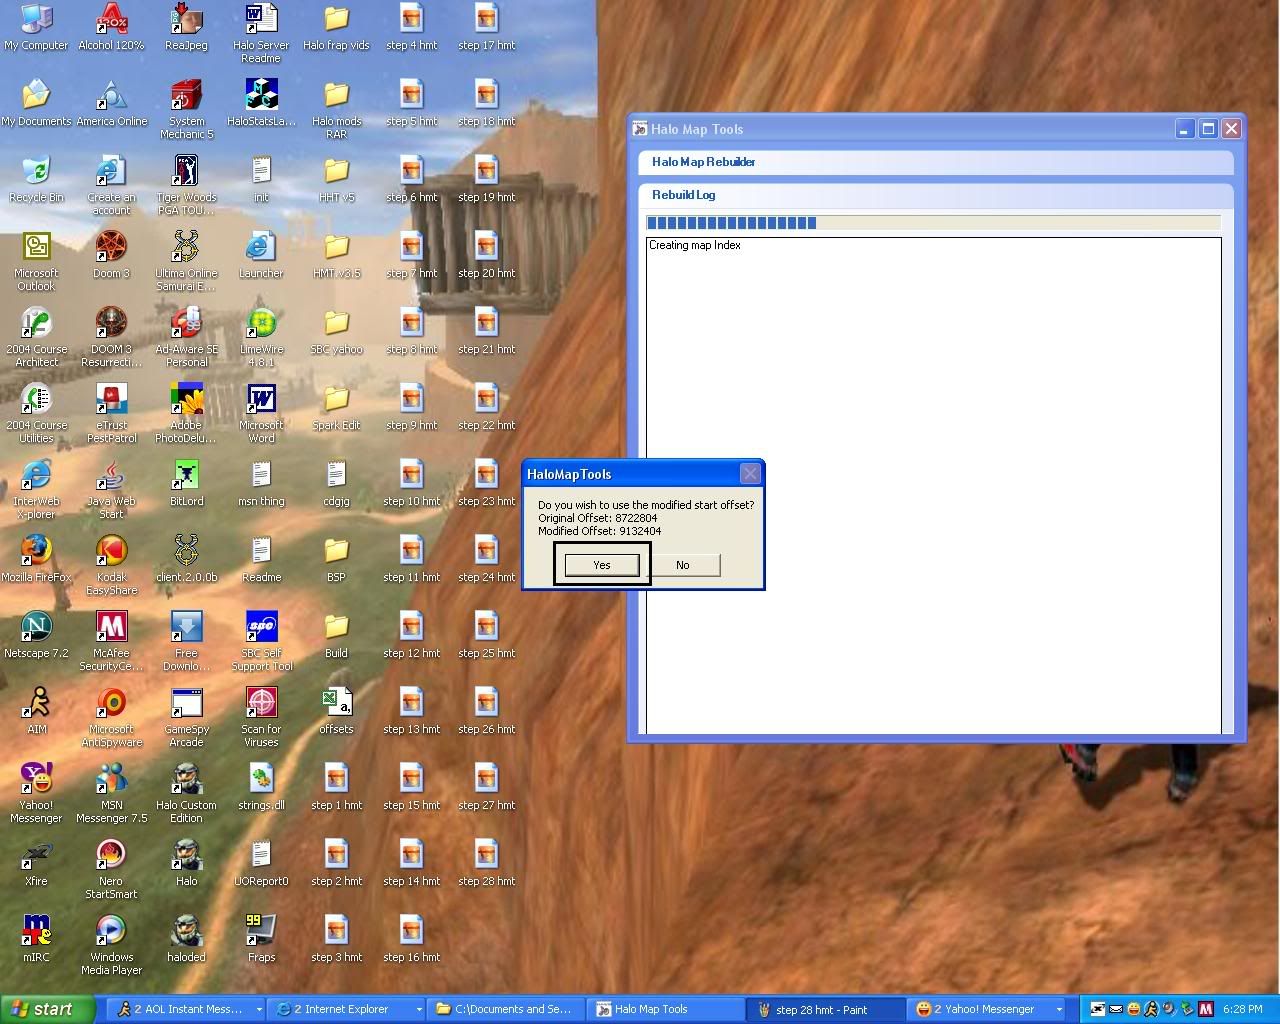
20.and after that it will ask about changing the offset of the map and you click yes
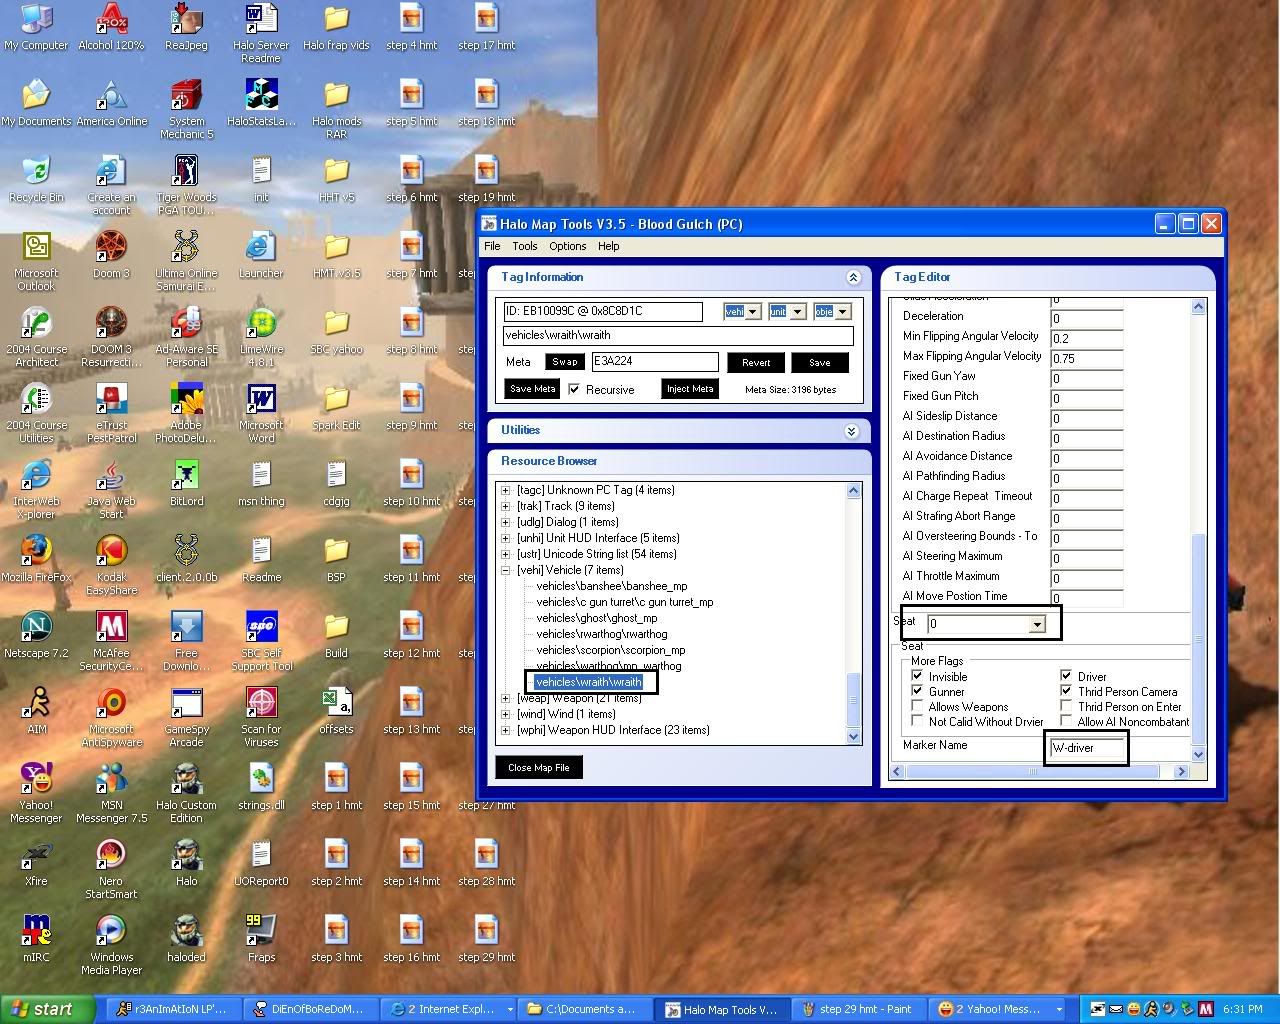
21.and finally it will tell you that the map has been rebuilt successfully and now open up the bloodgulch.map.rebuild.map file in the build folder and go to the vehicle tags and you will notice the wraith tag is added into the tags for that level then go to the bottom and click driver click 0 and change wraith-driver to W-driver and you can swap any of the vehicle meta with the wraith meta and then start up your map and you will have wraiths in your map
and that is all i have for today and later on i will be making for tutorials for everyone who uses HMT and i hope this tutorial will really help people who have problems with adding new vehicles and other things they want into the map and i will add if you want to do a different map with any other vehicle just do that same process but with the multiplayer map of your choice. and again im very sorry for taking up so much space for this skelito
1 make two folders a build folder and bsp folder on the desktop and put a NONMODDED map into the build folder.

2..open up HMT and open the map you want to add the wraith to for this one im doing it to bloodgulch....go to tools and click batch extract.

3.extract the metadata to the build folder and it will ask to extract the BSP and you click yes.

4..now you extract the map

5.after that is done you go to tools and click on BSP/model selections and you extract those folders to the BSP folder made on the desktop

6.now close that map and open up any map you want but for this map im going to open up b40.map

8.now when you have the map you want opened go to the vehicle's tag and and click on the wraith and save the meta and click on recursive and save it to the build folder

9.and save it to the build folder

10.now once the files are saved you now make a offset list in order to extract the files needed for the wraith(save files to desktop)

11.now go to tools and click on extract--> raw model and load the csv file that you saved

12.now open up the offset list you saved and scroll down to find the tag that says vehicles\wraith\wraith into the build folder where is tells you to extract the files to.

13.now go to tools and click on model decrapper and bsp builder and click add and go to the build folder and add the wraith.mod2.meta file


14. now click on the 3 icons below and add the 3 files.


15.now click on decrap this model and bsp chuck while were at it

16.now go to the bsp folder and when you decrap the files you made 3 new files and one will say bloodgulch.sbsp.meta and you copy and paste that into build folder--->levels--->test--->bloodgulch and paste that file in there and over write the existing one.

17.now close the map you have open in HMT and go to tools and click rebuild map and browse to find the map you put in the build folder and it will ask to add some files you need to rebuild and you click yes.

18.now go down to the bottom and right click and go to add....then go to the build folder and click on the vehicle folder and click on the wraith folder and copy those files into the add box in the map rebuilder.

19.and then while its rebuilding it will ask if any new vertices and indices have been changed and you click yes to both and add the two files in the BSP folder on the desktop


20.and after that it will ask about changing the offset of the map and you click yes

21.and finally it will tell you that the map has been rebuilt successfully and now open up the bloodgulch.map.rebuild.map file in the build folder and go to the vehicle tags and you will notice the wraith tag is added into the tags for that level then go to the bottom and click driver click 0 and change wraith-driver to W-driver and you can swap any of the vehicle meta with the wraith meta and then start up your map and you will have wraiths in your map

and that is all i have for today and later on i will be making for tutorials for everyone who uses HMT and i hope this tutorial will really help people who have problems with adding new vehicles and other things they want into the map and i will add if you want to do a different map with any other vehicle just do that same process but with the multiplayer map of your choice. and again im very sorry for taking up so much space for this skelito


 i feel so stupid
![nc]innova Avatar](http://www.freewebtown.com/MHCLAN/Forum_Stuff/avynorm.png)


